


You connect your laptop to what you know is a reliable power source. After a few seconds, a battery icon appears in your system tray warning that your laptop is charging slowly. Perhaps, you have a second charger. Maybe you tried using different cables. But the notification still appears no matter what you do.
If this sounds familiar, you are facing one of the rarest and most confusing warnings that Windows can throw at you. It is rare because it provides practically no information about the cause whatsoever. Your charging speed is low, but the error message does not say whether the culprit is your charger, your cable, your laptop’s charging port, a driver, or even the Windows battery utility itself.
The best part is that no matter what the reason is, it is almost certainly going to be on this short list. Moreover, you do not need to disassemble your laptop to find out. This guide will walk you through the potential causes one by one, starting from the most obvious and easy to check, and moving to the one that will actually fix the issue for the majority of cases: resetting the driver that is responsible for reporting battery health.
Why Windows Throws This Warning in the First Place
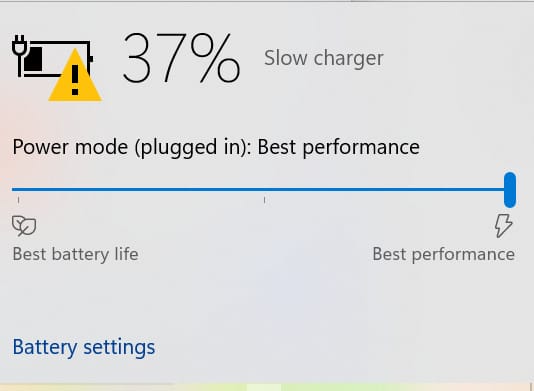
Every time you plug a USB-C charger into your laptop, the charger and the laptop have a quick exchange before any real power starts flowing. This is called USB Power Delivery, or USB-C PD for short, and it’s how the two sides agree on how many watts the laptop is allowed to draw. A laptop that needs 65 watts will ask for 65 watts. If the charger can only supply 20 or 30, the laptop settles for whatever it can get, and Windows lets you know by flagging the connection as slow. This whole exchange happens in a fraction of a second, and normally you never notice it at all. You only see evidence of it when the numbers don’t add up the way Windows expects.
Most of the time, that warning is accurate. You really did plug into something underpowered. But Windows can show the exact same warning when nothing is actually wrong with your power setup, and a few different things can cause that.
One common cause is the driver that manages battery and power reporting on your system, known as the ACPI driver, short for Advanced Configuration and Power Interface. Every so often it holds onto an old reading and keeps reporting a weak connection even after you plug in something far more capable. That’s one possible explanation, and it’s the one this guide spends the most time on, but it isn’t the only one. A charger that genuinely can’t supply enough wattage, a cable that isn’t rated for your laptop’s charging needs, a dirty or damaged port, or a dock or hub sitting between your charger and your laptop can all produce the same warning.
Because there are several possible causes, the fastest way to actually fix this is to rule things out in order rather than assuming you already know what’s wrong.
Rule Out a Hardware Problem First
Before you touch any drivers or settings, spend a few minutes checking the physical side of things. A software fix won’t help if the real problem is a charger that can’t keep up or a cable that isn’t built for fast charging.
Start with the charger itself. If your everyday charger triggers the warning, try a completely different one, ideally one you know is rated for your laptop’s full charging wattage. If a second charger causes the same warning, that’s a good sign the charger probably isn’t the issue.
Next, check the cable. Not every USB-C cable is built the same, even though the connectors all look identical. Some budget cables only support basic charging speeds or lower wattages, even on laptops that can normally charge much faster. If you have another cable you know supports higher wattage, swap it in and see if anything changes.
Take a look at the port too. Dust, lint, and small amounts of debris can build up in a USB-C port over time and interfere with a solid connection. A quick visual check, and a gentle clean with a dry brush or compressed air if needed, rules out a simple physical blockage.
Finally, if you normally charge through a dock, hub, or monitor rather than plugging the charger straight into your laptop, connect the charger directly and test again. Hubs and docks split their available power across every connected device, and depending on what else is plugged in, your laptop might not be getting the full wattage it’s asking for.
If you’ve gone through all of that and the warning still shows up no matter what you plug in or how you plug it in, software becomes a much more likely explanation, and it’s worth moving on to the checks below.
Explore More TechTheBest
Discover more practical technology guides, AI developments, cybersecurity news, gadgets, and emerging tech from TechTheBest.
https://techthebest.com/
Read more: How to Fix the “Slow Charger” Battery Warning on WindowsCheck Your Charger’s Power Rating
This step gets skipped more often than it should. Every laptop has a minimum wattage it needs to charge at full speed, usually somewhere between 45 and 100 watts depending on the model. If your charger can’t hit that number, Windows is right to flag it as slow.
You can usually find your laptop’s charging requirement in Settings, under System and then Power and Battery, or in the specifications listed on your manufacturer’s website. The charger itself should have its wattage printed somewhere on the body or the box, often shown as something like “65W,” or listed as an output in volts and amps that multiply out to the wattage.
If you recently switched to a smaller charger, maybe a compact one you picked up for travel, that alone could explain what you’re seeing. It isn’t broken. It just isn’t built to push enough power for full speed charging on that particular laptop.
As a rough guide, small and light laptops built mainly for browsing, email, and everyday office work usually need somewhere around 45 to 65 watts. Larger laptops built for video editing or heavier multitasking often sit closer to 90 watts. Gaming laptops and mobile workstations can need 130 watts or more, and in some cases a USB-C charger simply can’t supply that much power at all. If you own one of those higher powered machines, a USB-C charger might keep the battery from draining while you work, but it may never fully charge or reach top performance unless you use the charger that came with the laptop.
How Docks, Hubs, and Monitors Affect Charging
If you use a USB-C dock, hub, or monitor to charge your laptop while also connecting a mouse, keyboard, external drive, or a second monitor, keep in mind that all of those devices usually pull from the same shared pool of power. A dock rated for 90 watts of total output doesn’t necessarily send all 90 watts to your laptop once other accessories are drawing from it too.
This is an easy to miss cause of the slow charging warning, especially for anyone working from a single dock setup at a desk. If the warning only shows up when you’re docked, and disappears when you plug the charger straight into your laptop, that’s a strong sign the dock or hub is the bottleneck rather than anything on your laptop itself.
Some docks and monitors list a power delivery pass-through wattage that is lower than their total rated output, and that pass-through number, not the headline wattage printed on the box, is what actually reaches your laptop. If you’re not sure what your dock or monitor supports, checking its spec sheet for the pass-through or laptop charging wattage, rather than the total wattage, gives you a clearer picture of what your laptop is really getting.
Check for Software and Driver Issues
Once you’ve ruled out the charger, cable, port, and any dock or hub in the mix, it makes sense to look at software. This warning tends to show up right after a Windows update, a driver update, or a stretch of time where the laptop was left asleep instead of properly shut down.
Start with something simple: restart the laptop. That alone clears a surprising number of temporary power management glitches. If the warning is still there afterward, open Windows Update and check for anything pending, including optional driver updates, since a chipset or USB-C controller update can sometimes resolve this on its own. While you’re there, open Device Manager too and scan for any other device showing a warning icon, since a related driver issue elsewhere can occasionally cause the same symptom.
If none of that clears it, the next step is resetting the driver that specifically handles your battery reporting.
Reinstalling the ACPI Battery Driver
This sounds more technical than it actually is. You aren’t opening up the laptop or touching any hardware. You’re telling Windows to forget the current battery driver and install a fresh copy from scratch, which is a standard troubleshooting step for battery and power reporting issues.
Start by unplugging the laptop completely, whatever the power source is. Then right click the Start button, or press the Windows key and X together, and open Device Manager. Look for the category labeled Batteries and click the small arrow to expand it.
Underneath, you should see an entry called Microsoft ACPI-Compliant Control Method Battery. That’s the one this guide is about. Right click it and choose Uninstall device, then confirm when Windows asks if you’re sure. This removes the battery device from Device Manager. It doesn’t physically remove your battery, and it doesn’t touch your files or personal settings. Once you restart the laptop, Windows scans for hardware automatically, notices the battery device no longer has a driver, and installs a new one on its own.
Some laptops show more than one entry under Batteries, especially if the manufacturer bundles its own battery management software. If that’s the case on your machine, only uninstall the Microsoft ACPI-Compliant Control Method Battery entry, and leave anything else alone unless you specifically know what it does. If that entry isn’t listed at all on your system, skip this step and rely on Windows Update and your manufacturer’s support tools instead.
After the laptop restarts, plug your regular charger back in and check whether the warning is gone.
What If the Warning Still Won’t Go Away?
If you’ve been through the charger, cable, port, dock, and driver checks and the warning is still showing up, there are a few less common causes worth considering before assuming anything is seriously wrong.
A pending BIOS or firmware update from your laptop manufacturer can sometimes affect power reporting, so check your manufacturer’s support page for anything you might have missed. If your laptop came with its own power management software, such as Dell Power Manager, HP Power Manager, or Lenovo Vantage, take a look at its settings too. These tools sometimes include their own charging thresholds or power saving modes that can interact unexpectedly with Windows’ own reporting.
If none of that resolves it, and the warning shows up consistently across multiple chargers and cables even after a full driver reset, it may point to an issue with the charging circuitry inside the laptop itself. If Device Manager shows a numbered error code on any power related device, jot that number down. It’s a small detail, but it can help a support technician or manufacturer diagnose the issue faster than describing the symptom alone. At that point, contacting your manufacturer’s support team, or having the laptop looked at by a repair technician, is a reasonable next step.
Slow Charging vs. Battery Health Charge Limits
It’s worth separating this warning from a different feature many newer laptops include: battery health or charge limiting modes. A lot of manufacturers now offer a setting that intentionally stops charging around 80 percent, since keeping a lithium battery away from a full charge for long stretches can extend its lifespan over time. If your battery seems to level off well before 100 percent but there’s no slow charger warning showing up anywhere, that’s most likely a charge limit your manufacturer’s software has set, not the issue this guide covers. You can usually find that setting inside your manufacturer’s power management software, or in Windows Settings under System and then Power and Battery.
Keeping It From Happening Again
Most people who deal with this warning only see it once. It tends to follow a Windows update, a new charger, or a long stretch without a proper restart, rather than becoming a recurring problem. A few habits make it less likely to come back. Stick to chargers and cables rated for your laptop’s full charging wattage, especially when traveling. Keep your BIOS and chipset drivers reasonably current by checking your manufacturer’s support page every so often. And if you regularly charge through a dock or hub, keep an eye on how much power everything connected to it is pulling at once, since daisy chaining too many high power accessories through a single hub eats into the wattage left over for your laptop.
Confirming the Fix Worked
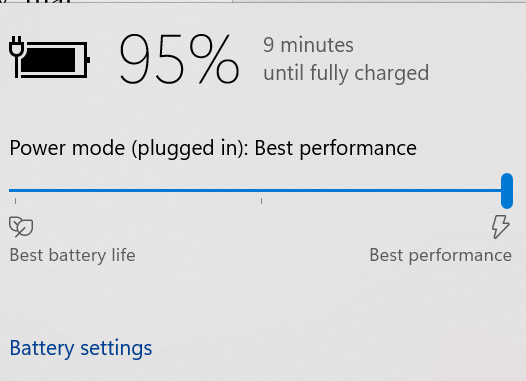
Once you’re back in Windows, plug in your usual charger and check the battery icon in your system tray. If the warning is gone and the battery is charging normally, the problem is very likely resolved.
If Windows still reports a slow charger after all of this, go back through the checklist rather than assuming the battery driver was ever the real cause. Sometimes it takes ruling out two or three things together, not just one, before the warning finally clears.
Quick Questions About the Slow Charger Warning
Is charging slowly bad for my battery?
No. If anything, charging at a lower wattage puts less stress on the battery than fast charging does. The warning is about speed, not damage.
Will uninstalling the battery driver delete anything or hurt my battery?
No. You’re only removing a software driver, not any files, settings, or the physical battery itself. Windows reinstalls the driver automatically after a restart.
Why did this start right after a Windows update?
Updates occasionally reset how a driver reads existing hardware, which can trigger a temporary false reading. It usually clears up with a restart or a driver reset rather than pointing to a bigger problem.
Does the wattage printed on the box actually matter, or is any USB-C charger fine?
It matters. USB-C is a shape of connector, not a guarantee of power output. Two chargers can use the exact same plug and deliver very different amounts of power, so the wattage listed on the charger is what actually determines charging speed.
Is it safe to use a charger with more watts than my laptop needs?
Yes. USB-C Power Delivery negotiates the exact wattage your laptop asks for, so a higher capacity charger simply has more headroom available. It won’t force extra power into a laptop that only needs 65 watts. The main thing to avoid is cheap, uncertified chargers and cables, since those are more likely to misreport their capabilities during that negotiation.
Why does one USB-C port on my laptop charge fine while another shows the warning?
Not every USB-C port on a laptop is built the same. Some are limited to data transfer or lower power delivery, and often only one or two ports on a given laptop actually support full speed charging. Check your laptop’s manual or manufacturer’s website to see which port is rated for full wattage charging.
Have you run into this warning on your own laptop? Let us know what fixed it for you in the comments below.
Keeping It From Happening Again
Most people who run into this only see it once. It usually follows a Windows update or a long stretch without restarting. There’s no need to treat it as an ongoing issue. Still, keeping your BIOS and chipset drivers current helps. It makes this kind of miscommunication between hardware and software less likely to begin with. Check your laptop manufacturer’s support page every so often for firmware updates. That matters most if you regularly switch power sources. Maybe it’s a wall charger at your desk during the week. And a solar panel or power bank when you’re traveling.
If the warning keeps coming back after a reset, pay attention to the pattern. A driver reset clears up the vast majority of cases. But a recurring issue on the same machine can point to something else. That’s worth flagging to your manufacturer’s support team.
Confirming the Fix Worked
Once you’re back in Windows, plug your usual charger in. Check the battery icon in your system tray. The yellow triangle should be gone. The “Slow charger” message shouldn’t pop up anymore. Your laptop should go right back to pulling full power the way it’s meant to. That means no more watching your battery drop while you’re plugged in and working.
It’s a small fix for a warning that looks far scarier than it is. Now you know exactly what’s going on the next time that yellow triangle shows up.
Did this fix the warning on your machine? Let us know in the comments.